Introduction
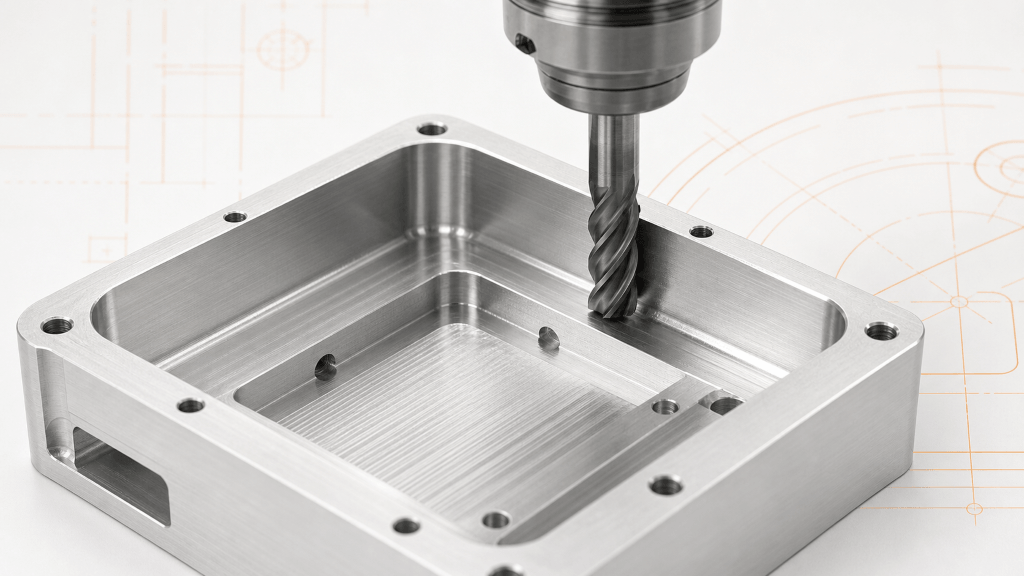
An internal corner radius is the rounded transition where two inside walls meet in a CNC-milled pocket, cavity or slot. It exists because a rotating cutter has a finite diameter. Unlike an external edge, which a tool can pass around, a vertical internal corner cannot be cut perfectly sharp with a conventional end mill.
That simple geometric fact affects much more than appearance. A small radius may require a smaller and longer tool, additional rest machining, slower cutting conditions and more inspection. A generous radius can permit a stronger cutter, a smoother toolpath and a shorter cycle. The correct choice depends on the function of the part, the depth of the feature, access direction, material, surface requirements and the capability of the selected CNC milling process.
This guide explains how engineers should specify internal corner radii without relying on one universal formula or a fixed list of R values.
What Is an Internal Corner Radius?
In a rectangular pocket, the side of the end mill generates the vertical walls. The tool center cannot move all the way into a mathematically sharp inside corner because the cutter body would intersect the part. The resulting plan-view corner therefore contains an arc that is related to the cutter diameter and programmed toolpath.
Do not confuse three different features:
- The vertical internal corner radius seen in the top view of a pocket.
- The floor-to-wall fillet at the bottom of a pocket.
- The corner radius on the cutting edge of a corner-radius end mill.
A flat end mill can generate a radiused vertical corner while leaving a comparatively sharp floor-to-wall intersection, subject to tool geometry and deburring. A corner-radius or bull-nose tool adds a radius at the cutting edge and therefore changes the pocket floor transition. A ball end mill creates a different bottom geometry and is generally used for 3D surfaces or finishing rather than as a universal solution for vertical pocket corners.
Why Sharp Internal Corners Are Difficult to Mill
Cutter Engagement Rises in the Corner
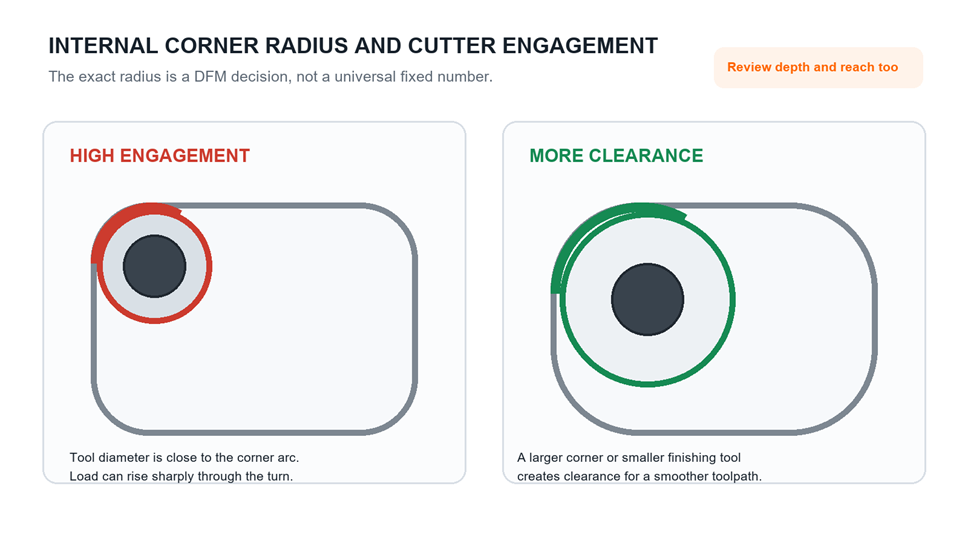
When an end mill follows a tight inside arc, more of its circumference can contact the material. Cutting load may rise even if the programmed feed remains unchanged. The result can be deflection, chatter, accelerated wear, poor finish or tool failure. Autodesk’s official discussion of machining internal corners explains that engagement angle and force increase as the tool enters a corner.
Smaller Tools Are Less Rigid
A smaller end mill can reach a smaller radius, but its reduced cross-section makes it less resistant to bending. The problem becomes more severe when the pocket is deep and the tool must extend farther from the holder. Tool deflection can leave taper, an oversize or undersize wall, inconsistent corner stock and visible marks.
The practical question is not only whether a cutter diameter exists. It is whether a suitable tool can reach the required depth, evacuate chips, survive the material and hold the specified tolerance and finish.
A Nominal Tool-Radius Match Leaves Little Clearance
If the desired internal radius is almost equal to the cutter radius, the tool may approach a very high engagement condition in the corner. A finishing tool that is smaller than the final corner arc gives the CAM programmer room to blend the path, manage engagement and leave a controlled finish. The amount of clearance is a process decision, not a universal percentage.
How to Select a Practical Internal Radius
Start With the Mating Function
First determine what must fit into the pocket. If the mating component has rounded or chamfered external corners, the pocket radius can often be increased without affecting assembly. If the mating component has square external corners, consider changing the mating part or using localized corner relief instead of demanding a fully sharp pocket.
Document the actual clearance requirement. A note such as “sharp corner required” is ambiguous. State the mating envelope, controlled faces and any no-interference zones on the 2D drawing.
Review Pocket Depth and Tool Reach Together
The same radius may be easy near the top of a shallow pocket and difficult at the bottom of a deep cavity. As depth increases, flute length, neck clearance, holder clearance and tool overhang become important. A larger radius often permits a larger-diameter and more rigid tool, but surrounding walls can still block the holder or spindle.
For deep features, include a section view and identify the full depth over which the radius applies. Avoid specifying a small corner for the entire depth if only the top portion interfaces with another part.
Consider Material and Heat
Aluminum, engineering plastics, stainless steel and hardened tool steels do not place the same demands on a small cutter. Material hardness, toughness, thermal behavior and chip formation affect tool choice, feed, coolant and achievable finish. A geometry that is economical in aluminum may require more conservative machining in stainless steel or a temperature-sensitive polymer.
Material also affects thin adjacent walls. If the corner sits beside a flexible feature, discuss rigidity and support as part of the overall CNC machining review because cutter load, clamping and residual stress can influence the final size after release.
Separate Functional and Nonfunctional Corners
Do not assign the smallest radius to every internal corner. Mark the corners that control fit, sealing, flow, cleaning or stress. Let nonfunctional corners use a larger standard radius agreed with the manufacturer. This reduces unnecessary tool changes and makes the drawing easier to interpret.
Ask for a Tooling Review Before Freezing the CAD
Manufacturers select cutters from actual reach, flute length, holder, material and machine capability. Send the CAD model while the geometry can still change. A brief DFM review can identify whether one tool can rough and finish the feature or whether a smaller rest-finishing tool is necessary. See the broader design for manufacturability guide for the information that should accompany a machining request.
Corner Radius, Pocket Depth and Cost
Internal radius affects cost through the complete machining plan rather than through one line on a drawing.
|
Design condition |
Likely process effect |
Cost implication |
|
Generous radius with shallow access |
Larger, shorter cutter and smoother path |
Lower risk and shorter cycle |
|
Small radius in a shallow pocket |
Smaller finishing tool or rest machining |
Extra tool and machining time |
|
Small radius at large depth |
Long-reach tool, reduced cutting load and added verification |
Higher risk, slower cycle and possible special tooling |
|
Tight corner plus tight profile tolerance |
Controlled finishing and more inspection |
Added programming, finishing and measurement time |
|
Square mating corner |
Relief geometry or a secondary process |
Additional design or process work |
Quantity also matters. A few prototype parts may justify a flexible multi-tool strategy, while repeat production may justify dedicated tooling, fixtures and an optimized sequence. Our prototype machining cost analysis explains how setup, cycle time and inspection combine in a quote.
Toolpath Strategies for Better Corners
Rough With Consistent Engagement
Modern adaptive or high-efficiency paths can keep radial engagement more consistent than simply driving a tool around the pocket boundary at full width. Entry, exit and linking moves should avoid abrupt loading. Sandvik Coromant’s official guidance to keep the cutter engaged reflects the importance of controlled engagement in milling.
Leave Uniform Finishing Stock
Roughing should leave predictable material for the finishing tool. Uneven stock in the corner can overload the finisher and reproduce roughing errors. A rest-machining operation can identify material that the larger roughing tool could not reach, then remove it with a smaller cutter.
Use Corner Smoothing and Appropriate Feed Control
CAM systems can blend motion, reduce feed in high-engagement regions and apply corner-finishing strategies. The exact settings depend on the machine, control, tool, holder, material and geometry. They do not rescue an impractical design, but they help manage a reasonable one.
Verify Remaining Stock
Simulation and rest-material analysis help find uncut corner stock before machining. Autodesk’s corner finishing documentation describes using an accurate rest model to identify unmachined corner regions. On critical parts, a prove-out cut and in-process check may still be appropriate.
When a Square Mating Corner Is Required
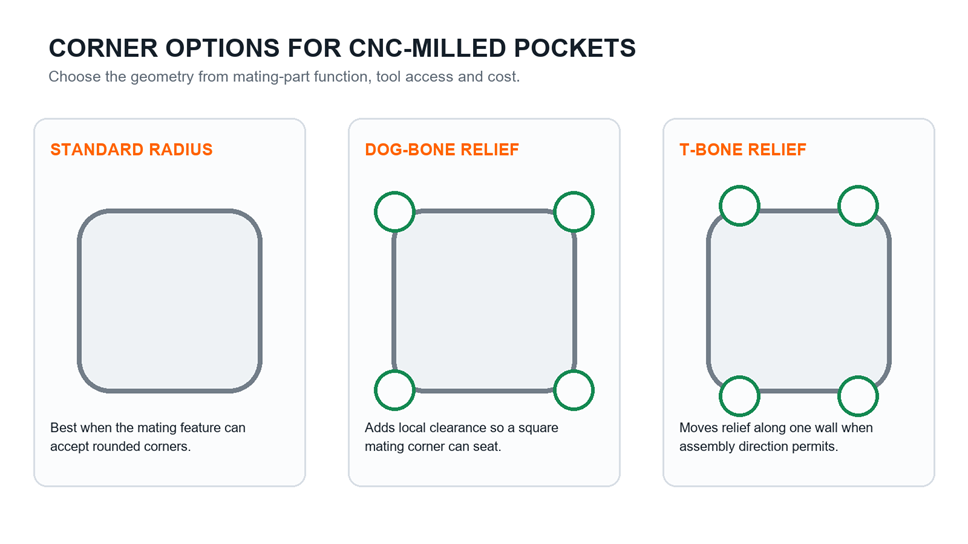
A designer often asks for a sharp internal corner because a square tab, plate or insert must seat fully. The best solution may be clearance rather than a different cutting tool.
Dog-Bone Relief
A dog-bone relief extends a circular cut beyond the nominal corner, usually along the corner bisector. It provides space for the square external corner of a mating component. The visible relief may not suit sealed, cosmetic or debris-sensitive areas, so confirm the application before using it.
T-Bone Relief
A T-bone relief moves the circular extension mainly along one adjoining wall. It can be useful when assembly direction or visible surfaces favor one side. The relief must remain accessible to the selected tool and must not weaken a critical edge.
Change the Mating Part
Chamfering or radiusing the external corners of the mating component is often the cleanest solution. This may preserve the pocket walls, simplify cleaning and reduce stress concentration. Check stack-up and assembly orientation before modifying either component.
Use Another Process Only When Function Justifies It
Sinker EDM can create internal details that conventional milling cannot produce efficiently, including small radii or sharp features in conductive materials. Wire EDM is useful only when the geometry is accessible through the workpiece along the wire path; it is not a substitute for machining a blind pocket. Broaching or specialized tooling may suit repetitive through-features. These processes add setup, lead time and cost, so reserve them for a verified functional requirement.
Floor Radii and 3D Corners
A vertical wall corner and a floor-to-wall fillet should be dimensioned separately when both matter. A standard flat end mill may leave a small bottom transition determined by its edge condition, while a bull-nose tool intentionally produces a floor fillet. A ball end mill can finish blended 3D corners but generally requires multiple passes to achieve the target surface.
If a large floor fillet carries load, specify it from structural requirements and make sure the chosen tool can reach the entire surface. If the bottom transition is not functional, avoid an unnecessarily tight tolerance or surface-finish requirement.
Tolerancing and Drawing Practice
Dimension the Functional Boundary
Use dimensions and tolerances that describe how the corner affects fit. Radius size alone may not control the full wall relationship. Profile tolerancing can sometimes communicate the allowable surface boundary more clearly, but datum selection and inspection method must support the function.
ASME Y14.5 establishes standardized rules and practices for dimensioning and tolerancing. Apply the relevant standard specified by your organization and do not mix drafting conventions without agreement.
Avoid Conflicting CAD and Drawing Requirements
The 3D model, 2D drawing and general notes should agree. If the CAD contains R2.0 but the drawing says “all internal corners R1.0 max,” the supplier must stop and request clarification. Identify which document governs and flag model-based definition requirements where applicable.
Define Surface Finish Only Where Needed
Very small finishing tools can leave visible blend lines or require additional passes. Specify roughness or cosmetic requirements on the surfaces that matter, not automatically on the entire cavity. The CNC machining surface finish guide explains the difference between measured roughness, visible tool marks and preparation for secondary finishing.
How Internal Radii Are Inspected
Inspection method depends on size, depth, tolerance and access.
- Radius gauges can provide a quick comparison on accessible, noncritical features.
- Optical measurement can evaluate a visible profile without contact.
- A CMM can measure accessible points and compare the surface with the CAD model.
- A contour or scanning method may be appropriate when the complete profile matters.
- A functional mating gauge may be the most direct evidence when seating clearance is the requirement.
A reported radius value is meaningful only if the sampling strategy represents the surface. Define the datum setup, depth and acceptance condition. For broader planning, review Samshion’s quality assurance and inspection systems.
DFM Checklist for Internal Corners
- Identify which corners are functional and which may use a larger standard radius.
- Check the mating component and add an external chamfer or radius where possible.
- Review radius and pocket depth together.
- Provide tool and holder clearance around deep features.
- Avoid using the smallest radius throughout the complete depth unless function requires it.
- Decide whether dog-bone or T-bone relief is acceptable for square mating parts.
- Separate vertical corner radii from floor fillets.
- Apply tight tolerance and surface finish only to functional surfaces.
- Define the drawing standard, datums and inspection method.
- Request DFM feedback before releasing production drawings.
Request an Internal Corner DFM Review
Send the 3D CAD model, 2D drawing, material, quantity, finish and mating-part information. Mark the functional corners, required depth and inspection condition. Samshion can review tool access, likely machining sequence, relief options and cost drivers before production. Upload your CAD files for a quote.
Frequently Asked Questions
Can a CNC mill make a perfectly sharp internal corner?
Not with a conventional rotating end mill in a blind pocket. The cutter produces a radius. A localized relief, a change to the mating part or another process may meet the functional need.
Should the pocket radius equal half the end-mill diameter?
That describes the cutter’s physical radius, but it does not automatically create a stable finishing condition. A finishing cutter smaller than the final corner arc usually provides path clearance. The required margin depends on depth, material, tool reach, tolerance and machine dynamics.
Does a smaller internal radius always cost more?
Not always, but it often narrows the tooling choices and may add rest machining, slower feeds, extra tool changes or inspection. The cost effect is greatest when a small radius is combined with a deep pocket, hard material, tight tolerance or cosmetic finish.
What is the difference between a dog-bone and T-bone relief?
Both add local clearance beyond the nominal corner. Dog-bone relief generally extends around the corner direction, while T-bone relief shifts clearance along one wall. Selection depends on assembly direction, appearance, strength and tool access.
Can 5-axis machining eliminate internal corner radii?
No. Five-axis positioning can improve access and allow shorter tools on some surfaces, but a rotating cutter still has a finite diameter. Review 5-axis CNC machining when access, setup count or complex surface orientation is the main constraint.