Polypropylene is light, chemically resistant and available in stock shapes that can be machined without investing in an injection mold. It is also softer, more elastic and more sensitive to temperature than many engineering plastics. Those properties make it useful, but they also explain why a part can measure differently while clamped, after release and again after its temperature changes.
Successful CNC machining of polypropylene is therefore not based on one special speed or one preferred cutter. It depends on the complete manufacturing plan: the PP grade and stock condition, part geometry, cutter sharpness, chip evacuation, workholding, machining sequence, measurement temperature and tolerance priorities.
Quick answer: CNC machining is a practical choice for PP prototypes, replacement parts and low-volume production when the drawing uses realistic tolerances and the setup limits heat and elastic deformation. Use sharp tools, support flexible geometry, remove material in balanced stages, allow the part to stabilize before final inspection, and validate critical dimensions on the actual grade.
What Is Polypropylene?
Polypropylene, commonly abbreviated as PP, is a semi-crystalline thermoplastic used in chemical equipment, fluid-handling components, laboratory fixtures, electrical insulation, food-contact equipment and many general industrial products. Its low density helps reduce weight, while its non-polar structure contributes to low moisture absorption and broad chemical resistance.
PP is not one uniform material. Homopolymer, random copolymer, impact copolymer, medical, food-contact, flame-retardant, conductive and glass-filled grades can differ substantially in stiffness, impact behavior, thermal expansion and regulatory status. Colorants and fillers may also change cutting behavior and dimensional response.
Ensinger lists low moisture absorption and high thermal expansion among the characteristic properties of PP stock shapes. Its polypropylene material overview is a useful reference for understanding why PP can avoid the moisture-related movement associated with some nylons while still requiring careful temperature control.
Before quoting a precision part, identify the grade, manufacturer, stock form, color, certification and service environment. Writing only “PP” on a drawing leaves too many variables open.
Compare PP with other machinable plastics and metals in our manufacturing materials guide.
Why Is Polypropylene Difficult to Machine Accurately?
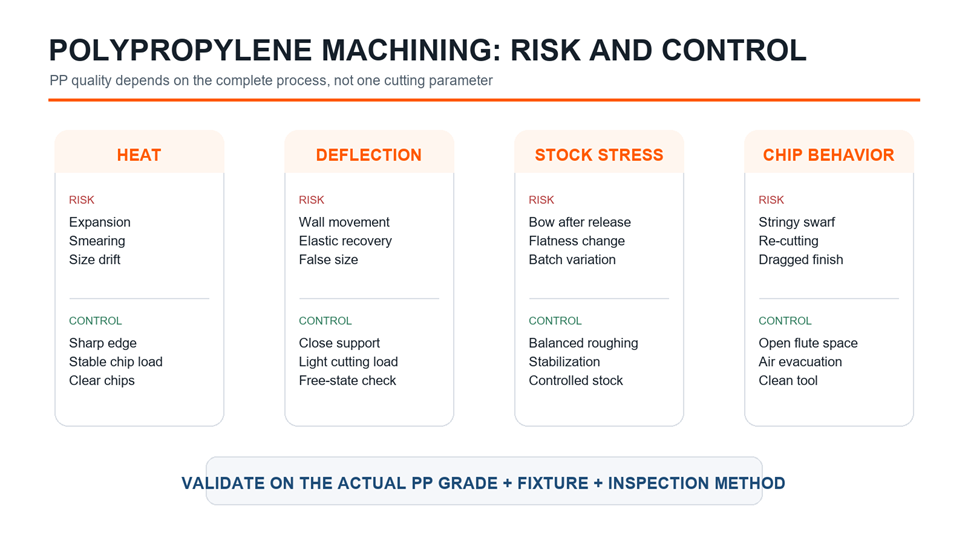
Heat changes both the cut and the measurement
PP transfers heat poorly compared with metal and has a relatively high coefficient of thermal expansion. Friction from a dull edge, rubbing tool or recutting chips can warm a local feature. The material may expand during cutting and then move as it returns to the inspection temperature.
The LyondellBasell polypropylene primer shows that the coefficient of linear thermal expansion changes with temperature and cautions that production-part data can vary with grade and processing history. This is why one generic shrinkage or temperature-correction value should not be applied to every PP part.
Cutting force can deflect the workpiece
An unsupported wall, ring or thin plate may move away from the cutter and spring back after the tool passes. A tightly clamped feature may also measure correctly in the fixture but relax out of tolerance after unloading. More clamping force is not necessarily the solution because it can simply reproduce the fixture shape in the part.
Chips can smear, wrap or return to the cut
PP often produces continuous, stringy chips. If chips remain around the tool, they can rub the new surface, create heat, obscure the cutting edge or wrap around a small cutter. Clean chip evacuation is part of surface-finish and dimensional control, not just housekeeping.
Stock stress can be released during material removal
Extruded sheet, rod and tube contain a manufacturing history. Removing a large amount of material from one side can unbalance internal stress and cause bow, twist or flatness change. This is especially visible in wide plates, thin frames and parts with a deep pocket on one face.
When Should You CNC Machine PP?
CNC machining is often suitable when:
- the quantity is too low to justify an injection mold;
- the project needs the actual specified PP stock material;
- the design is changing and tooling flexibility matters;
- the part contains precise holes, sealing interfaces or assembly datums;
- a prototype must be tested before injection-molding design is frozen;
- a legacy or replacement component is needed without original tooling.
Injection molding usually becomes more attractive as quantity rises and the design stabilizes. It can produce complex ribs, living hinges and thin walls more efficiently, but it introduces mold cost, draft, gating, shrinkage and process-development requirements. A machined PP prototype also has a different material orientation and residual-stress history from a molded part, so it does not predict every molded behavior.
For high-volume intent, use machining to verify assembly and function, then review the part again for molding. Our CNC machining services and injection-molding capabilities can support that transition without treating the two processes as geometrically identical.
Select the PP Grade and Stock Form First
Homopolymer PP
Homopolymer PP is generally stiffer than impact copolymer grades and is commonly selected for chemical, electrical and general industrial parts. Its exact stiffness and temperature capability remain grade dependent.
Copolymer PP
Copolymer grades are often selected when impact resistance or low-temperature toughness matters. Their lower stiffness may make thin or weakly supported features more sensitive to cutting and clamping loads.
Filled PP
Glass or mineral reinforcement can increase stiffness and reduce thermal expansion, but filled grades may be more abrasive and anisotropic. Tool life, edge quality and dimensional behavior may differ by fiber content and orientation. Do not transfer an unfilled-PP setup directly to a reinforced grade without a trial.
Medical, food-contact and controlled grades
A material family name does not prove compliance. Specify the exact grade and required declarations. Keep coolant, cleaning agents, handling and traceability compatible with the application.
Choose plate, rod or tube stock that minimizes unnecessary removal and provides enough machining allowance. Store sheet flat and supported. Röchling’s PP sheet handling guideline recommends flat, low-stress support and protection from storage conditions that can promote distortion or material change.
Tooling and Cutting Strategy for PP
Use a genuinely sharp cutting edge
A sharp edge shears PP with less force and less rubbing. Positive-rake, polished tools designed for non-ferrous materials or plastics are often useful starting points. A single-flute cutter can provide generous chip space in small tools, but flute count should be selected with spindle capability, feed, diameter, engagement and chip evacuation in mind. It is not correct to declare one flute count best for every feature.
Make chips instead of rubbing
Heat often increases when the feed is too low for the selected speed and the cutting edge rubs instead of taking a stable chip. Starting parameters should come from the tool supplier, then be proven on the actual grade and setup. Watch the chip, surface, sound, spindle load and measured feature rather than copying a metal program unchanged.
Limit engagement and clear chips continuously
Use step-down, radial engagement and toolpaths that avoid trapping chips in deep pockets. Clean compressed air or a compatible cooling method can remove chips and reduce local heat. Any coolant must be reviewed for material compatibility, cleaning requirements and the end-use application.
Ensinger’s machining guidelines for semi-finished plastics emphasizes low heat input, sharp tools and attention to plastic properties such as thermal expansion, low strength and poor heat conduction.
Separate roughing and finishing when geometry is sensitive
For a part with deep pockets, a thin floor or asymmetric material removal, rough the geometry with a controlled allowance, release or re-balance the setup when practical, allow stabilization, then finish the critical features. A light finish pass cannot correct a part that is still moving under the cutter or fixture.
Workholding Without Distortion
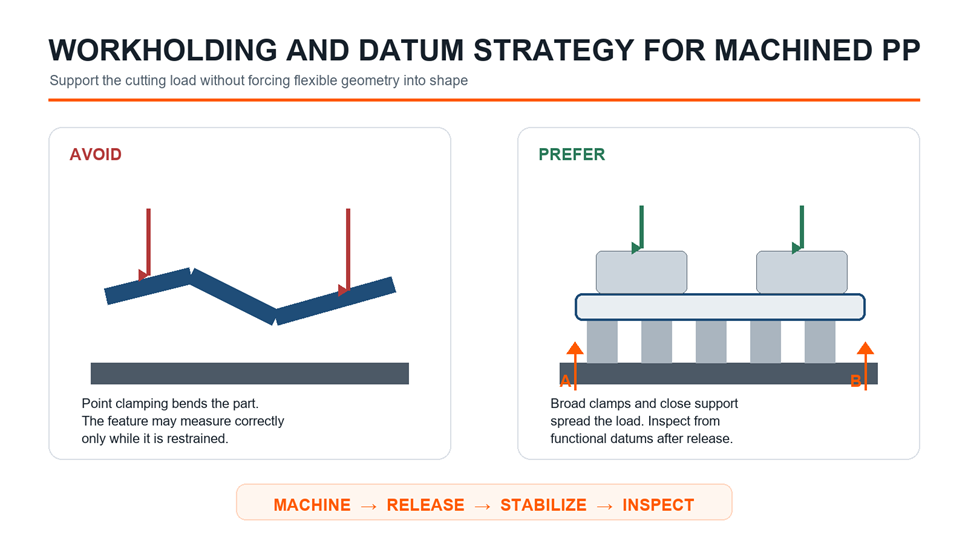
The fixture should locate the part repeatably while applying only the force needed to resist cutting. Useful approaches include:
- broad soft jaws that spread force over a larger area;
- shaped nests that support thin walls or curved profiles;
- sacrificial plates and low-profile tabs for sheet parts;
- controlled vacuum workholding for suitable broad surfaces;
- machined plugs or mandrels for flexible rings and tubes;
- stop features that carry cutting load instead of relying on friction alone.
Support should be placed close to the cutting load. Avoid gripping a thin wall and then machining the opposite side without backing. If vacuum is used, confirm that the pressure differential does not pull a thin floor into the fixture and create a false flatness condition.
For multi-operation parts, design the datum transfer before programming. Use stable, functional features rather than a cosmetic surface that may flex or contain stock variation.
Design Guidelines for CNC-Machined PP Parts
Use realistic wall thickness and support long spans
There is no universal minimum wall thickness. A small supported wall can be more stable than a much thicker but longer unsupported panel. Evaluate wall height, span, cutter access, clamping direction and the load during inspection. Increase thickness or add temporary machining support when deflection risk is high.
Add internal radii
Milled internal corners require a radius. A larger radius permits a larger, stiffer tool and usually reduces machining time, vibration and heat. Keep the corner radius greater than the cutter radius where possible so the tool does not remain highly engaged through the corner.
Avoid unnecessarily deep, narrow pockets
Deep pockets require long-reach tools and make chip removal difficult. The surrounding walls may also relax as material is removed. Open access, reduce depth, increase corner radii or split the design when the pocket is not functionally necessary.
Design holes and threads for the actual load
Drilling should produce a clean chip without dwelling at the bottom. Deep small holes may require staged withdrawal for chip clearance. Thread strength in unfilled PP is limited by the material, not simply by tap quality. Use adequate engagement, avoid sharp thread runouts and consider a mechanical insert when the joint will be assembled repeatedly or loaded highly.
Specify datums and critical dimensions
Do not apply a very tight general tolerance to the entire drawing. Identify the features that control sealing, alignment, bearing position or assembly. Use a datum scheme that matches how the part functions and how it can be inspected without excessive restraint.
Our CNC milling service can review cutter access, pocket depth, radii, workholding and inspection strategy before production.
Polypropylene Machining Tolerances
A supplier should not promise one tolerance for every PP feature. Achievable capability depends on part size, wall stiffness, stock condition, temperature range, fixture, machining sequence and measurement method.
Use these rules when assigning tolerances:
- Tighten only dimensions that affect function.
- State the measurement temperature when thermal movement is significant.
- Define whether flatness and profile are measured free-state or in a functional fixture.
- Avoid chaining many tight dimensions across a flexible part.
- Provide separate controls for size, location and form when each matters.
- Approve the inspection method before production for very flexible features.
PP’s low moisture absorption removes one common source of movement, but it does not remove thermal expansion, elastic recovery or stress release. For a close-fitting assembly, evaluate the operating temperature and the expansion difference between PP and the mating metal or plastic.
Inspection and Dimensional Stabilization
Measure parts after they have returned to an agreed temperature and have been removed from machining loads. A just-machined feature may not represent the stabilized result.
Use low and repeatable contact force on flexible walls. A micrometer, caliper, bore gauge or CMM probe can deflect the feature if applied incorrectly. Where shape matters, define support points and use a fixture that represents the functional assembly without forcing the part into specification.
An inspection plan may include:
- incoming verification of material grade and stock dimensions;
- first-setup checks before the complete feature is finished;
- free-state inspection after unclamping;
- stabilization time before final measurement;
- functional gauges for sealing, mating or insertion features;
- first-article documentation for critical dimensions;
- periodic checks for drift during repeat production.
For repeat orders, preserve the proven stock source, cutter type, fixture, program revision and inspection method. Changing one of these variables can change the result even when the CAD model is unchanged.
Common PP Machining Problems and Corrective Actions
|
Problem |
Likely causes |
Corrective direction |
|
Fuzzy edge or burr |
Dull edge, unsupported exit, chip recutting or unsuitable tool geometry |
Replace or sharpen the tool, support the exit, improve chip clearance and adjust the cut direction |
|
Melted or glossy smear |
Rubbing, excessive heat, poor chip evacuation or long dwell |
Restore chip load, reduce rubbing, clear chips and review speed, feed and engagement together |
|
Hole closes after drilling |
Elastic recovery, heat, drill geometry or measurement before stabilization |
Use a sharp drill, control heat, validate size after stabilization and finish by a proven method |
|
Wall thickness varies |
Workpiece deflection, weak support, cutter deflection or uneven stock |
Improve support, reduce cutting load, use balanced passes and verify the datum setup |
|
Part bows after release |
Asymmetric removal, stock stress or clamping distortion |
Rough both sides in stages, reduce forced flattening, allow stabilization and review stock condition |
|
Surface has dragged tool marks |
Chip recutting, built-up material or rubbing |
Improve evacuation, clean the cutting edge and confirm the tool is shearing |
|
Dimensions drift through the batch |
Tool wear, fixture loading variation, temperature change or inconsistent stock |
Monitor the process, standardize loading, control temperature and inspect at defined intervals |
Surface Finish and Deburring
The best finish is produced during cutting. Secondary deburring should remove residual material without rounding a sealing edge, thinning a wall or changing a critical dimension. A sharp hand scraper, controlled trimming tool, soft abrasive or purpose-built fixture may be appropriate depending on geometry.
Do not assume that every standard plastic finish works on PP. Its low surface energy makes painting, printing and bonding more difficult without compatible pretreatment and chemistry. If appearance or identification is required, define the process during quotation and test it on the exact grade. See our plastic surface-treatment guide for selection considerations.
How to Reduce the Cost of Machined PP Parts
PP stock may be inexpensive, but material price alone does not determine part cost. Thin flexible geometry, deep pockets, many setups, difficult deburring and tight inspection requirements can dominate the quote.
Cost can often be reduced by:
- selecting a stock size close to the finished envelope;
- loosening nonfunctional tolerances;
- increasing internal radii;
- opening deep pockets for better tool access;
- using standard threads and hole sizes;
- combining dimensions under a clear datum strategy;
- avoiding cosmetic requirements on hidden surfaces;
- providing an annual quantity and batch schedule for fixture planning.
For repeated quantities, compare continued machining with injection molding or another near-net-shape process. The correct transition point depends on tooling investment, geometry, material, inspection and demand stability, not one universal order quantity.
What to Include in a PP Machining RFQ
Send the following information for a useful engineering review:
- 3D CAD file in STEP format;
- 2D drawing with datums, critical tolerances and thread specifications;
- exact PP grade, manufacturer and color, or permission to propose alternatives;
- required quantity, repeat schedule and spare first-article pieces;
- operating temperature and chemical exposure;
- regulatory, food-contact, medical or flame requirements;
- cosmetic surfaces and acceptable tool-mark or burr standard;
- mating-part CAD or functional gauge requirements;
- inspection report, material certificate and traceability needs;
- preferred delivery date and packaging requirements.
CNC Machining Polypropylene DFM Checklist
Before releasing the order, confirm that:
- The exact PP grade and stock form are identified.
- Tolerances are concentrated on functional features.
- Measurement temperature and free-state or restrained condition are clear.
- Thin walls and long spans can be supported during cutting.
- Internal radii permit practical, stable cutters.
- Deep holes and pockets have adequate chip access.
- Threads have enough engagement for the service load.
- Material removal is balanced where flatness matters.
- Cosmetic and deburring requirements are documented.
- The quote includes the required inspection and certification package.
Request a Polypropylene Machining Review
Send your CAD files, drawing, PP grade, quantity and operating conditions. Samshion can review the geometry, stock form, workholding, machining sequence and inspection plan before quotation.
Frequently Asked Questions
Can polypropylene be CNC machined?
Yes. PP sheet, rod and tube can be milled, turned, drilled and threaded. Accuracy depends on controlling heat, elastic deflection, workholding and measurement conditions.
What is the best cutter for machining PP?
There is no single best cutter for every feature. Use a sharp, positive-cutting tool with enough flute space for chip evacuation. Select diameter, flute count and geometry for the operation, spindle range, engagement and part stiffness, then validate on the actual grade.
Why do machined PP parts warp after unclamping?
Common causes include asymmetric material removal, residual stress in the stock and a fixture that forced the part into a flat or round condition. Roughing in balanced stages, supporting the part without overclamping and allowing stabilization before finishing can reduce the risk.
Can machined polypropylene hold tight tolerances?
It can hold useful precision on stable, well-supported features, but capability must be evaluated by geometry and measurement method. A short bore in a thick section behaves differently from flatness across a large thin plate.
Should PP be annealed before or after machining?
Do not apply an improvised heat cycle. Stock suppliers may already use controlled stress-relief processes, and unsuitable heating can distort the part or alter properties. Discuss annealing with the stock manufacturer and machining supplier for the exact grade, thickness and requirement.
Is machined PP equivalent to injection-molded PP?
Not completely. The same resin family may be used, but stock production, molecular orientation, residual stress and geometry differ. Machining is valuable for fit and functional testing, while molding-specific behavior must be validated with molded samples.