Learn the full overmolding process, critical precautions, and actionable pro tips. Master multi-material overmolding to avoid delamination, warpage, and molding defects for high-quality plastic parts.
What Is Overmolding Process?
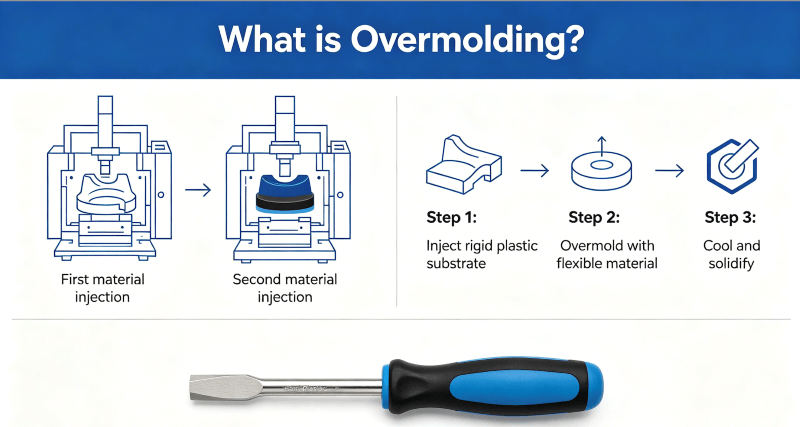
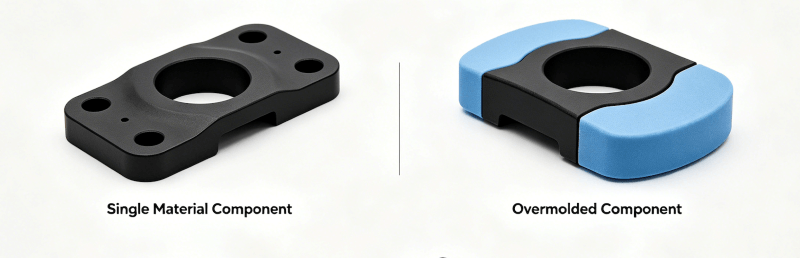
Overmolding (also known as two-shot molding or multi-material insert molding) is an advanced injection molding process that bonds two or more different materials into a single integrated component without adhesives, glue, or mechanical fasteners. The core principle is to inject and mold the secondary material directly onto the pre-formed primary substrate, forming a stable chemical and mechanical combination structure during the high-temperature molding process.
Where is Overmolding Applied for?
This manufacturing technology is widely used in consumer electronics, automotive parts, medical devices, daily hardware, and industrial accessories. Common overmolding combinations include hard plastic + soft rubber, rigid ABS + TPU, PP + silicone, and metal + plastic. It effectively optimizes product grip performance, shock resistance, waterproof performance, appearance texture, and structural stability.
What merits does overmolding process own?
Compared with traditional secondary bonding and assembly processes, overmolding features higher production efficiency, stronger structural integrity, better durability, and lower long-term failure rates, making it the mainstream process for multi-functional composite plastic parts.
Standard Overmolding Process Flow
Samshion factory overmolding runs on standardized procedures. Careful execution of every stage reduces rejects and keeps bonding quality consistent.:
Material Selection & Compatibility Verification
Confirm the matching of substrate and overmold materials, verify chemical and thermal compatibility, and eliminate incompatible material combinations to prevent delamination.
Mold Design & Preprocessing
Complete cavity design, shut-off surface setting, and draft angle optimization; clean and preheat the mold to stabilize molding temperature.
Primary Substrate Molding
Inject and mold the rigid primary material, complete cooling and shaping, and ensure the substrate has sufficient structural strength to resist secondary injection pressure.
Substrate Positioning & Installation
Place the qualified substrate into the secondary mold cavity accurately to avoid displacement and deformation.
Secondary Overmold Injection
Inject the flexible or functional secondary material, control injection pressure, speed, and holding time precisely.
Cooling & Demolding
Complete uniform cooling according to wall thickness parameters, then eject the finished product to avoid forced demolding damage.
Inspection & Post-Processing
Check for bonding firmness, surface defects, and dimensional accuracy, and perform trimming and surface treatment if necessary.
Pro Tips for Overmolding
Overmolding has stricter process requirements than single-shot injection molding. Most common defects such as peeling, warpage, flash, and incomplete filling are caused by non-standard process control. The following key precautions must be strictly followed in mass production:
Material Compatibility Control
Material incompatibility is the primary cause of overmold delamination and falling off. Manufacturers must confirm material matching parameters before production:
First, ensure consistent thermal expansion coefficients of the two materials to avoid bonding failure caused by uneven thermal contraction and expansion.
Second, select chemically compatible material pairs to form effective molecular bonding; avoid mismatched combinations such as partial hard plastics and non-polar elastomers.
In addition, uniformly control the shore hardness of soft overmold materials according to product usage scenarios to balance grip comfort and structural stability.
Hard Substrate + Soft Overmold Material Bonding Performance
| Rigid Base Material | Easy-to-Bond Soft Elastomer (Strong Adhesion) | Hard-to-Bond Soft Elastomer (Prone to Delamination) |
| ABS / ABS+PC | Polar TPE, TPU, Polyester TPE, PVC soft compound | PP-based TPE, EPDM, natural rubber, non-polar TPR |
| PC / PC+GF | TPU, Polyester TPE, Thermoplastic PUR, Soft PVC | PP TPE, EPDM, non-polar olefin elastomers |
| PP / PP+talc / PP+GF | PP-based TPE, EPDM, olefin TPR | TPU, polyester TPE, polar soft PVC, silicone (without primer) |
| Nylon PA6 / PA66 | TPU, polyamide TPE, special nylon-bond TPE | Ordinary PP TPE, EPDM, general non-polar elastomers |
| POM | Special modified TPU, dedicated POM-bond TPE | All standard PP TPE, EPDM, unmodified TPU, silicone |
| PS / HIPS | Polar TPE, soft PVC, ester TPE | PP TPE, EPDM, olefin elastomers |
| Metal (Aluminum/Steel) | Silicone, TPU with metal adhesive primer, modified TPE | Unmodified PP TPE, EPDM without surface treatment |
| Glass | Silicone, special adhesive-modified TPU | Conventional olefin TPE, unprocessed TPR |
1. Polar elastomers (TPU, ester TPE) form reliable chemical bonds with polar hard plastics like ABS, PC, PA.
2. Non-polar olefin elastomers (PP TPE, EPDM) only stick firmly to non-polar PP substrates.
3. For mismatched material pairs with poor adhesion, mechanical interlock structures or surface primer coating are required to avoid peeling and delamination.
Why Strict Wall Thickness So Important?
Wall thickness directly determines molding yield and product stability. The industrial standard overmold layer thickness is 1.5mm–3mm: a thickness below 1mm is prone to short shots and incomplete filling; a thickness exceeding 4mm will cause sink marks, shrinkage cavities, and prolonged cooling cycle time. Meanwhile, the primary substrate wall thickness must not be less than 1.5mm, which can effectively resist the impact pressure of secondary injection and prevent substrate deformation and displacement. It is also necessary to avoid abrupt thickness transitions to prevent local stress concentration and warpage.
Recommended Wall Thickness for Overmolding (mm)
| Category | Material Combination | Min Thickness | Ideal Thickness Range | Max Allowable Thickness | Design Risk If Out of Range |
| Rigid Substrate (Hard Base) | ABS / ABS+PC | 1.2 | 1.5–3.0 | 4.0 | <1.2mm: substrate deformation under secondary injection pressure; >4.0mm: sink marks, long cooling cycle |
| PC / PC+GF | 1.5 | 1.8–3.2 | 4.5 | Thin substrate easy to crack; thick PC leads to uneven shrinkage & warpage | |
| PP / PP+Talc | 1.0 | 1.5–2.8 | 3.8 | Low rigidity: thin walls shift during overmolding positioning | |
| Nylon PA6/PA66 | 1.3 | 1.6–3.0 | 4.2 | Thin nylon absorbs moisture, weakens bonding strength | |
| Metal Insert (Al/Steel) | 1.0 (surrounding plastic) | 1.2–2.5 | 3.5 | Too thin plastic layer causes metal exposure & stress cracking | |
| Soft Overmold Layer (TPE/TPU/Silicone) | Polar TPU / Ester TPE | 0.5 | 1.5–2.5 | 3.0 | <0.5mm: short shot, incomplete coverage, poor adhesion; >3.0mm: heavy shrinkage, bubbles, long cycle |
| PP-based TPE / EPDM | 0.6 | 1.2–2.2 | 2.8 | Poor flow at ultra-thin sections; thick layer easy to peel off substrate | |
| Liquid Silicone LSR | 0.8 | 1.8–3.0 | 3.5 | Thin silicone fails sealing function; thick silicone severe shrinkage |
Standard Wall Thickness Tolerance for Overmolding
| Part Layer | Nominal Thickness Range | General Mass Production Tolerance | Precision Medical/Auto Tolerance | Rule of Thumb |
| Hard Substrate | ≤2.0 mm | ±0.10 mm | ±0.05 mm | Thickness variation shall not exceed ±25% of nominal value |
| 2.0–4.0 mm | ±0.15 mm | ±0.08 mm | Avoid abrupt thickness transition over 50% | |
| Soft Overmold Layer | ≤1.5 mm | ±0.12 mm | ±0.06 mm | Elastomer shrinks more; tighter mold shut-off required |
| 1.5–3.0 mm | ±0.20 mm | ±0.10 mm | Soft material tolerance wider than rigid substrate |
General Dimensional Tolerance for Complete Over-molded Parts (Linear Sizes)
| Basic Dimension (mm) | Standard Commercial Grade | High Precision (Auto/Electronics) | Ultra-Precision (Medical LSR) |
| 0–10 | ±0.10 | ±0.05 | ±0.025 |
| 10–30 | ±0.15 | ±0.08 | ±0.04 |
| 30–80 | ±0.20 | ±0.12 | ±0.06 |
| 80–150 | ±0.30 | ±0.18 | ±0.10 |
| >150 | ±0.40 | ±0.25 | Custom tolerance |
Standardized Mold Design and Ejection Rules for Overmolding
Reasonable mold design is the basis for smooth overmolding production. All overmold surfaces need to be equipped with a draft angle of 2°–5° to reduce ejection friction and avoid surface scratching and part deformation during demolding. Precision shut-off surfaces must be set at the mold closing position to prevent overflow and flash of soft rubber materials. For soft overmold parts with high flexibility, adopt segmented ejector pins or gas-assisted ejection mechanisms to ensure complete demolding without damage. In addition, always keep the mold cavity clean and dry to avoid dust and moisture affecting bonding tightness.
Precise Control of Overmolding Injection Parameters
Injection temperature, pressure, speed, and holding time are the key parameters affecting overmolding quality. The mold temperature must be accurately adjusted according to material characteristics: excessive temperature will cause the substrate to remelt and deform, while too low temperature will result in poor surface melting and insufficient bonding. The injection speed should be moderate and uniform: too fast will lead to material overflow and flash, while too slow will cause material cooling in advance and incomplete cavity filling. Appropriate holding time is required to compensate for material shrinkage and eliminate sink marks and bubbles.
Why Need to Control Environment & Cycle Time?
Keep the production environment dry and constant temperature to prevent substrate surface moisture from weakening molecular bonding force. The interval between primary substrate molding and secondary overmolding should be shortened as much as possible to ensure the substrate retains appropriate surface activity; meanwhile, reserve sufficient cooling time for the substrate to avoid secondary injection pressure deformation. Avoid rapid temperature changes during the production process to prevent internal stress of parts and later warpage and cracking.
What Practical Overmolding Process Tips Help Boost Production Yield?
Based on years of industrial production experience, the following practical overmolding tips can effectively reduce defect rates, improve production efficiency, and enhance product appearance and durability, suitable for small-batch trial production and large-scale mass production:

Optimize Substrate Structural Design in Advance
Add mechanical interlocking structures such as tiny holes, slots, and undercuts on the substrate surface before molding. These structures can significantly improve the physical bonding force between the two materials, effectively solve the problem of easy peeling of smooth-surface over-molded parts, and greatly improve the product’s resistance to vibration and tensile load. Avoid full smooth bonding surfaces, which will lead to insufficient friction and poor stability.
Preheat Substrate & Mold Properly
Proper preheating of the substrate and mold before secondary injection can remove surface moisture, activate material molecular activity, and significantly improve bonding strength. Preheating can also reduce the temperature difference between the substrate and the overmold material, make the material fusion more uniform, and avoid delamination caused by inconsistent cooling speed. Note that the preheating temperature must be lower than the substrate melting point to prevent substrate deformation.
Classify Material Matching Scenarios Precisely
Summarize and classify conventional material matching schemes to improve trial production efficiency: For daily grip parts (tool handles, toothbrush handles), match hard PP/ABS + soft TPR/TPE to ensure anti-slip and comfort; for waterproof and shockproof parts (electronic accessories), match PC + TPU with better elasticity and wear resistance; for high-temperature resistant products, choose silicone + engineering plastic combinations. Targeted material matching can avoid performance defects and repeated mold modifications.
Adopt Graded Cooling Strategy
Do not use rapid cooling after secondary molding. Adopt a graded cooling mode of first slow then fast: slow cooling in the early stage ensures full material fusion and stable bonding; accelerated cooling in the later stage improves production efficiency. This method can effectively eliminate internal residual stress of parts, reduce warpage and shrinkage deformation, and improve the dimensional stability of finished products.
Strengthen Pre-Production Testing & Inspection
Before mass production, conduct small-batch trial production and adhesion test, tensile test, and thermal cycle test on sample parts to verify process parameter stability. During mass production, regularly sample and inspect bonding firmness, surface flatness, and dimensional tolerance, and adjust injection parameters in time according to product changes to avoid batch defective products. Early intervention of process and mold engineers can effectively reduce costly later revisions.
Common Overmolding Defects & Quick Solutions
In actual production, overmolding is prone to several typical defects. The following quick troubleshooting schemes help solve problems efficiently:
Delamination & Peeling
Causes include incompatible materials, insufficient mold temperature, and substrate surface moisture.
Solutions: Replace matching materials, increase preheating temperature, and keep the production environment dry.
Sink Marks & Shrinkage
Caused by excessive overmold wall thickness and insufficient holding time.
Solutions: Optimize wall thickness to 1.5–3mm and extend appropriate holding time.
Flash & Overflow
Caused by excessive injection pressure and loose mold shut-off surfaces.
Solutions: Reduce injection pressure appropriately and repair mold sealing gaps.
Substrate Deformation
Caused by insufficient substrate thickness and excessive secondary injection pressure.
Solutions: Increase substrate wall thickness and optimize injection pressure parameters.
What Makes the Overmolding Process a Choice?
Overmolding process is a high-precision and high-value multi-material molding technology. Its production quality depends on standardized process flow, precise parameter control, reasonable material matching, and scientific mold design. By mastering the core process precautions and practical operation tips, Samshion can effectively avoid common defects such as delamination, warpage, and flash, greatly improve product yield and production efficiency, and produce over-molded parts with stable structure, excellent performance, and perfect appearance.
FAQs
Q1: What is the difference between overmolding and insert molding?
Overmolding mainly bonds two kinds of plastic materials, while insert molding is to inject plastic on metal, glass, and other hard inserts. Both belong to composite molding processes, but overmolding focuses on multi-plastic material compounding, and insert molding focuses on plastic and heterogeneous material compounding.
Q2: How to improve the bonding strength of over-molded parts?
Three core methods: select chemically and thermally compatible material pairs, add mechanical interlocking structures on the substrate surface, and optimize mold temperature and injection parameters to ensure full material fusion.
Q3: What is the most suitable overmold wall thickness?
The optimal thickness range is 1.5mm–3mm. This range can avoid short shots, sink marks, and excessive cooling cycle time, balancing molding quality and production efficiency.